Dental implants represent one of the most advanced and reliable solutions in modern restorative dentistry for replacing missing teeth. Unlike traditional dentures or bridges, implants provide a permanent, natural-looking, and fully functional replacement that integrates directly with your jawbone. This in-depth guide walks you through the entire dental implant procedure step by step, including detailed descriptions of what each stage typically looks like in clinical photos and what patients can realistically expect. Whether you’re missing a single tooth, several teeth, or considering full-arch restoration, understanding the process helps reduce anxiety and leads to better outcomes.
This comprehensive overview is based on standard clinical protocols used by experienced implant dentists and oral surgeons. The entire journey usually spans 3 to 9 months or longer, depending on individual healing and any preparatory procedures needed.
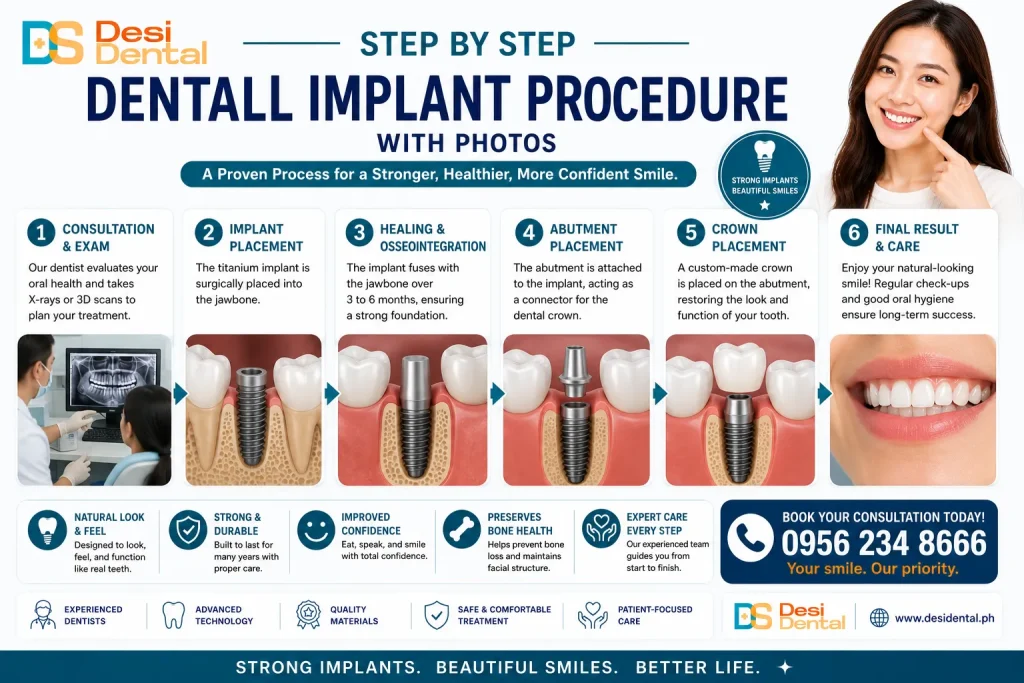
Step-by-Step Dental Implant Procedure with Photos
1. Initial Consultation and Comprehensive Evaluation
The process always begins with a detailed consultation. Your dentist or implant specialist will review your complete medical and dental history, perform a thorough oral examination, and assess bone quality, gum health, and bite alignment.
Diagnostic tools commonly used:
- Digital X-rays and 3D Cone Beam Computed Tomography (CBCT) scans
- Digital impressions or intraoral scans
- Photographs of your current smile and bite
What consultation photos typically show:
- Intraoral views of missing teeth gaps, adjacent teeth condition, and gum tissue health.
- Radiographic images highlighting bone density and sinus or nerve proximity.
- Digital treatment planning software with virtual implant placement for precision.
During this visit, the provider determines your candidacy, discusses options (single implant, implant-supported bridge, All-on-4/All-on-6 for full arch), and creates a personalized treatment plan with a timeline and cost estimate. Factors like smoking, diabetes, osteoporosis, or bruxism (teeth grinding) are carefully evaluated as they can influence success.
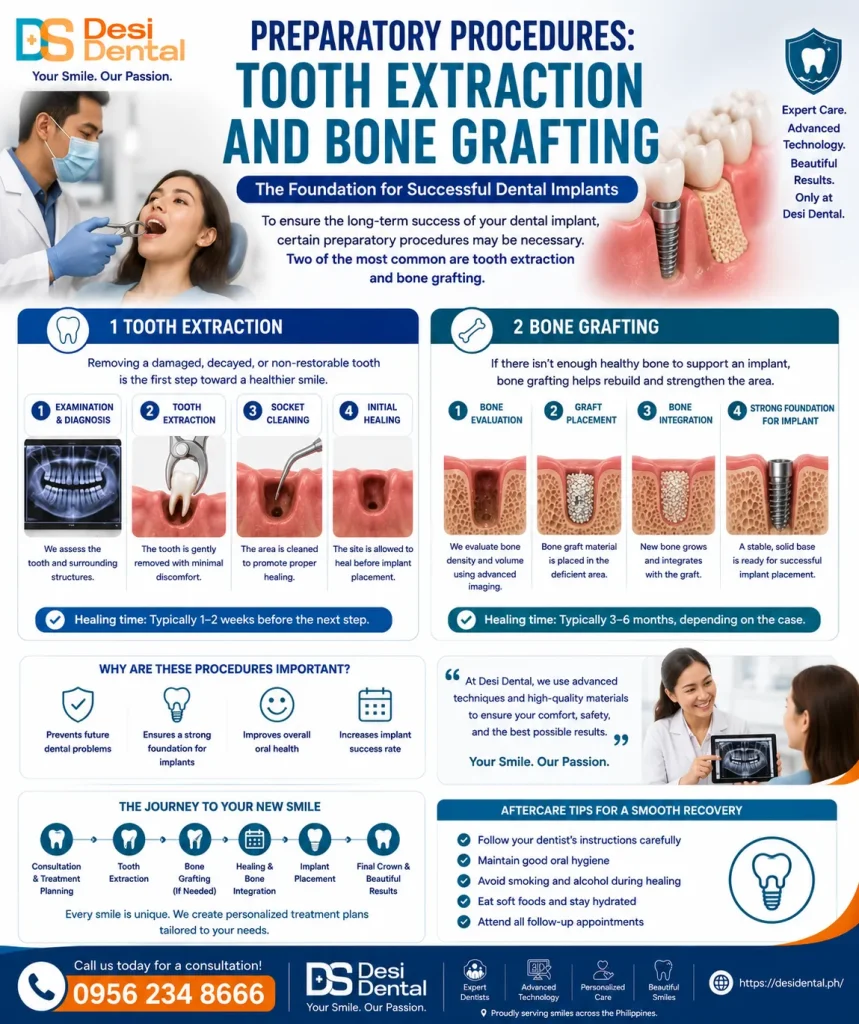
2. Preparatory Procedures: Tooth Extraction and Bone Grafting
If a damaged or decayed tooth is still present, it must be extracted first. Extraction is usually straightforward and performed under local anesthesia or sedation.
Visuals from extraction photos:
- The affected tooth being gently removed.
- The empty socket immediately afterward, often appearing as a clean, bleeding bony socket.
Bone Grafting (if needed): Many patients require bone augmentation because prolonged tooth loss leads to jawbone resorption. Grafting rebuilds volume and density using your own bone, donor bone, or synthetic materials.
Common grafting techniques:
- Socket preservation (right after extraction)
- Sinus lift for upper jaw implants
- Ridge augmentation for horizontal/vertical bone loss
What bone grafting photos illustrate:
- Flap reflection exposing the jawbone.
- Placement of bone graft material mixed with growth factors.
- Application of protective membranes or titanium mesh secured with pins/screws.
- Healing progress at follow-up appointments.
Healing after grafting can take 3–6 months or more before implant placement.
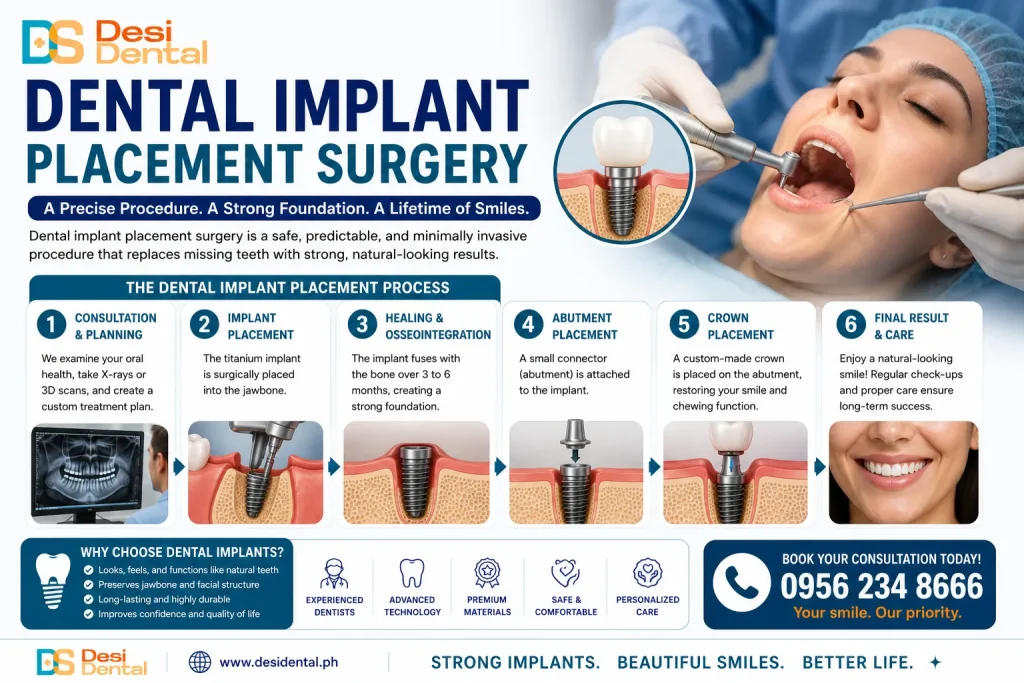
3. Dental Implant Placement Surgery
This is the core surgical phase. The procedure is typically performed as an outpatient surgery under local anesthesia, with optional sedation for comfort.
Step-by-step surgical process:
- Administration of anesthesia and (if used) sedation.
- Small incision in the gum to expose the bone.
- Use of surgical guides (often 3D-printed) for precise positioning.
- Sequential drilling to create the exact-sized osteotomy (hole) in the bone.
- Insertion of the titanium implant post (the “root”).
- Attachment of a healing abutment (for one-stage) or cover screw (for two-stage).
- Suturing the gum tissue closed.
Detailed surgical photos typically capture:
- Gum flap elevation revealing healthy bone.
- Guided drilling sequence with irrigation to prevent overheating.
- Titanium implant being torqued into place.
- Healing abutment protruding through the gums (in immediate or one-stage protocols).
- Final sutured site, often with minimal swelling visible right after.
The surgery usually lasts 30–90 minutes per implant. For multiple implants, it may take longer.
4. Osseointegration: The Critical Healing Phase
After placement, the implant undergoes osseointegration — the biological process where living bone cells grow tightly around the implant surface, creating a strong, stable foundation.
Typical timeline:
- Lower jaw: 3–4 months
- Upper jaw: 4–6 months
- Longer if grafting was extensive or in compromised bone
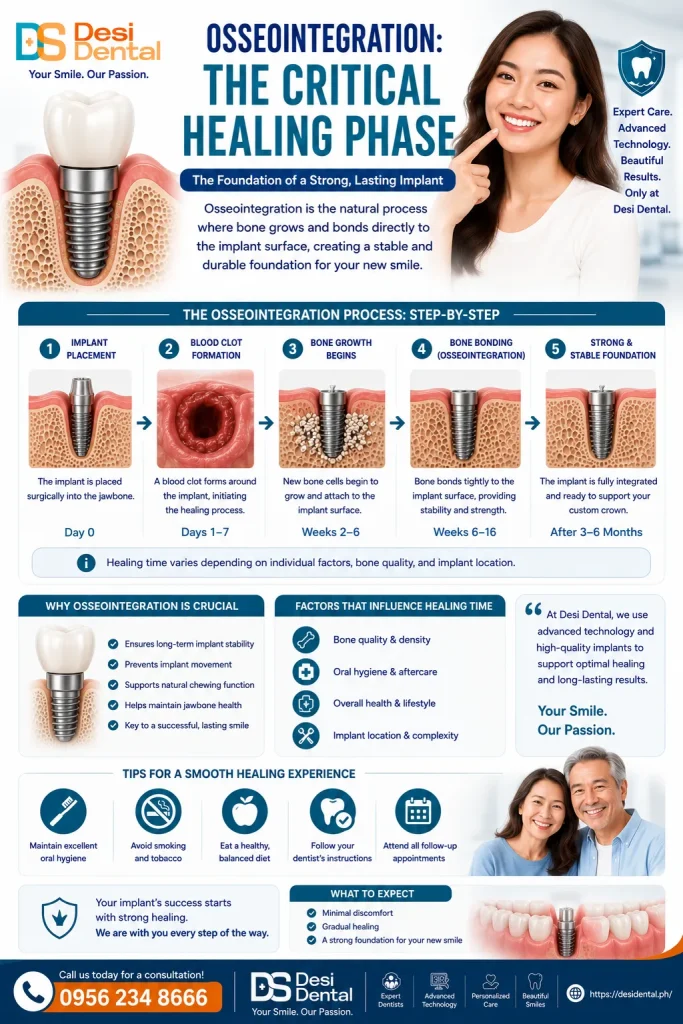
What healing photos show over time:
- Initial post-op swelling and bruising (first 1–2 weeks).
- Gradual reduction of inflammation and gum maturation.
- Follow-up X-rays demonstrating progressive bone integration around the implant threads.
During this phase, patients follow a soft diet, maintain excellent oral hygiene, and attend periodic check-ups. Temporary restorations (if used) help with aesthetics and function.
5. Abutment Placement
Once osseointegration is confirmed (via clinical and radiographic evaluation), the abutment — a small connector post — is attached to the implant.
Procedure details:
- Minor surgery to expose the implant if a cover screw was used.
- Placement and tightening of the custom or stock abutment.
- Healing of surrounding soft tissue (usually 2–4 weeks).
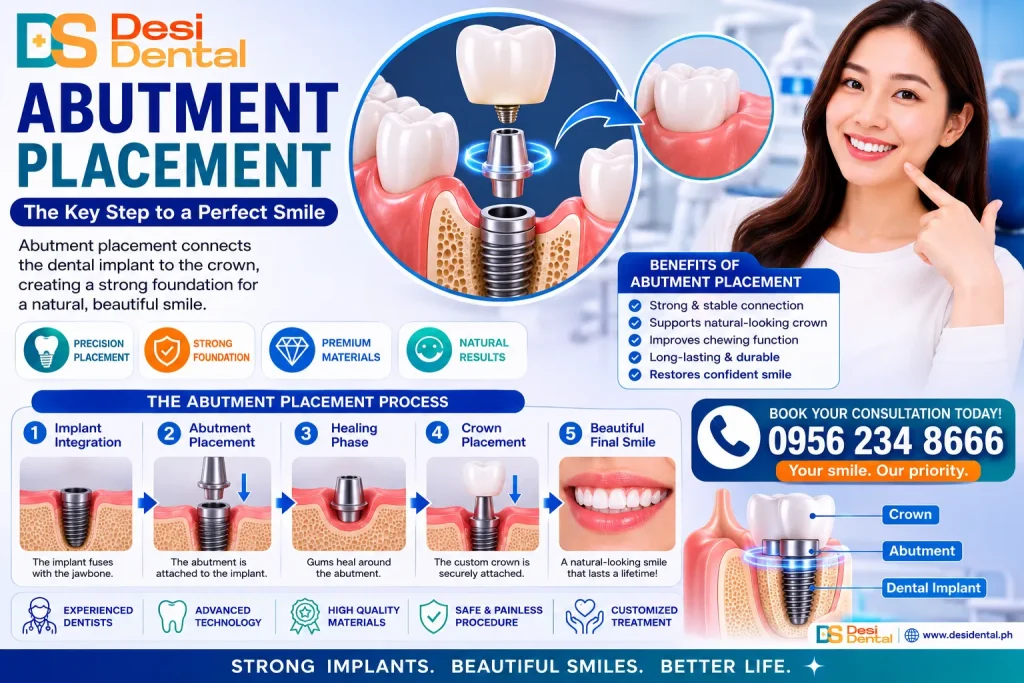
Photos at this stage often display:
- The titanium abutment securely connected and protruding above the gum line.
- Healthy pink gum tissue forming a natural seal around it.
6. Final Restoration: Crown, Bridge, or Prosthesis
The last step involves creating and attaching the visible tooth replacement.
Process:
- Digital scans or traditional impressions of the abutment and opposing teeth.
- Laboratory fabrication of a custom crown, bridge, or full prosthesis (often using high-quality zirconia or porcelain).
- Trial fitting, adjustments for bite and aesthetics.
- Permanent cementation or screw-retention.
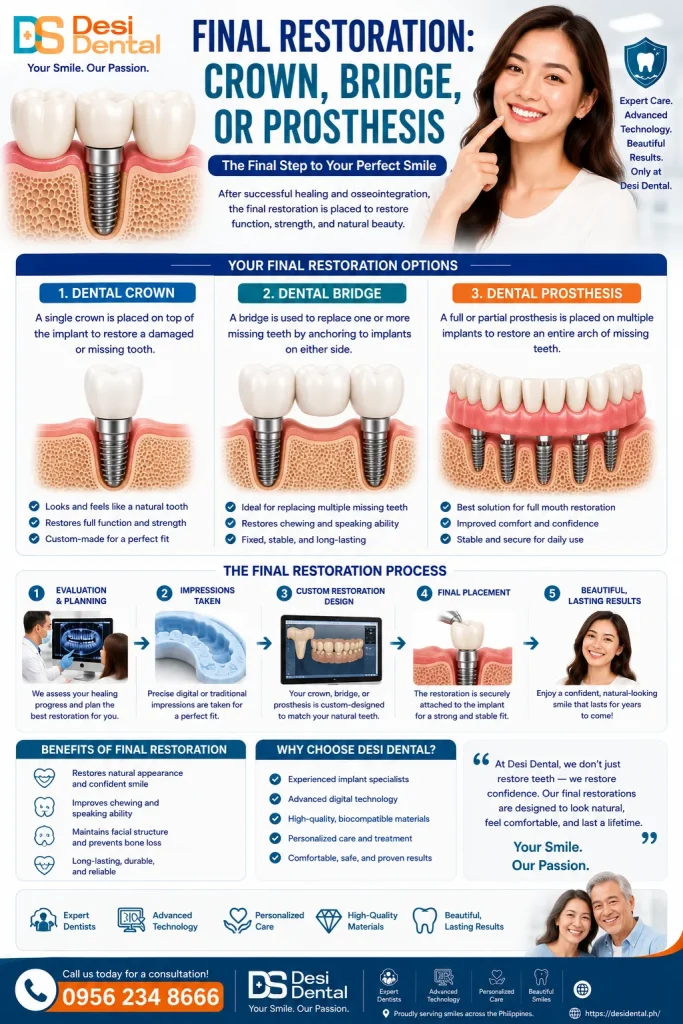
Before-and-after photos are particularly impressive:
- Natural color, shape, and translucency matching adjacent teeth.
- Seamless integration that restores full chewing function and confident smile.
- Radiographs confirming proper seating and bone levels.
Frequently Asked Questions (FAQs)
How painful is the dental implant procedure? Most patients report discomfort similar to a tooth extraction, well-managed with anesthesia and medication.
Can I get implants the same day as extraction? In select cases with good bone quality, immediate placement is possible, but not always recommended.
Are dental implants suitable for everyone? Most healthy adults qualify. Certain medical conditions require careful management.
How much do dental implants cost? Costs vary widely by location, number of implants, and need for grafting. Consult your provider for a personalized quote.
The dental implant procedure is a predictable, life-changing investment in your oral health and overall well-being. By following this step-by-step journey with clear visual descriptions of each phase, you can approach treatment with confidence and realistic expectations.
This article is for educational purposes only and does not replace professional dental advice. Always consult a qualified implant dentist or oral surgeon for a personalized evaluation. If you’re considering dental implants, schedule a consultation today — your new smile awaits!